Light is usually hotly debated topic among orchid growers. This is because light is vital to growing orchids successfully and it can be very complicated. There are probably as many opinions as there are growers – and here are mine.Before we deep dive into the science of light, a basic rule of thumb is to aim for light to medium green leaves. If the leaves are too dark the orchid is not getting enough light. With too much light the leaves will turn yellow or burn. Many orchids will also produce a red pigment when it is getting a bit too much light. The pigment acts like a sunscreen protecting the leaf from burning. A light blush is not harmful, in fact some plants require this much light in order to thrive. With less light the blush will most likely disappear. You can train the orchid to take more light by gradually moving it closer to the light source. I grow my orchids indoors pretty far north on the northern hemisphere. In the deep of winter we only get about 6 hours of daylight here and the sun doesn’t even reach half way up on the horizon. So in order to grow orchids that originally grow in regions much closer to the equator I have to add supplemental lighting in order to pull it off. So, what kind of supplemental lighting should I get for my orchids? Well, first we need to lay down some fundamental science… stick with me here, you will be glad you did.
The science bit
Photosynthesis is the process where plants use energy from light to convert carbon dioxide to food so they can grow. When light intensity increases, net photosynthesis increases. The spectral range of solar radiation that plants actually use for this process is called the Photosynthetically Active Radiation (PAR), which ranges from 400-700 nm (nanometers). It is just about same range as what we refer to as visible light.
The human eye peaks in the yellow-green region, around 550 nanometers while there are two important peaks for plants: blue at 450–495 nm which promotes vegetative growth, and red at 620–750 nm which promotes flowering and budding. Plants need more red light than blue. Chlorophyll, the main pigment found in plants, is most proficient in converting this red and blue light into the energy needed for photosynthesis. Light from the green part of the spectrum is mostly reflected, which is why leaves appear green to our eyes.

Practical application
When we put in artificial lighting I think it makes the most sense to provide as much light from the spectral range which the plant can most efficiently use without expending unnecessary energy – in other words within the PAR spectral range. Choose a daylight bulb or a mix of blue and red light sources.
Kelvin and CRI – or the color of light
The science bit
The kelvin scale is used to measure the color temperature of light sources. Based on the principle that a black body radiator, such as an incandescent light bulb, emits light and the temperature determines its color. CRI (color rendering index) measures the ability of a light source to reproduce colors of objects faithfully in comparison with a natural light source. True artificial daylight light sources should have a CRI value above 90, but not all do.
A light source that closely imitates sunlight is referred to as natural light or daylight. Pure sunlight has a temperature of around 5,000 degrees Kelvin and a CRI of 100. Unobstructed equatorial sunlight at noon is considerably higher, but factors such as time of day, cloud cover, pollution etc. affect the color temperature in reality. When sunlight and atmosphere combine in the northern hemisphere it forms a color temperature between 5000–6500k, which is slightly bluer than equatorial sunlight due to the atmosphere.
Technically bulbs leaning heavily towards the blue spectrum (6000-6500K) promotes vegetative growth, and warmer bulbs (3000K) promotes blooming. Using daylight bulbs (5000-6500K) is really the best option for both growing and blooming your orchids.
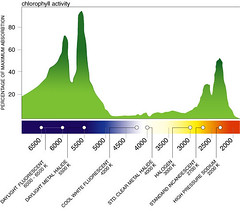
The picture shows an extremely simplified model converting kelvin numbers to nanometers of wavelength. The astute observer will notice that the peaks don’t exactly match… On the chart “red” peaks at 2200K, in reality the chlorophyll red peak occurs at 660nm, 4400K. I am using the image, with this disclaimer, since it still helps to illustrate the point.
Practical application
If emulating daylight is what we aim for with our supplemental growing lights then Lord Kelvin is the man. In broad strokes you would think of it as warm (2700 K) neutral (4200 K) and cool (6000 K).
If you want good growing results and also natural looking light, then choose a light source with a daylight color temperature ranging between 5000-6500 K.
The CRI value mainly pertains to the aesthetics of the light – how you want to see your plants. The higher the CRI value (sun = 100) the more natural they will appear under the lights.
Foot candles, lux and lumen – or the light output
The science bit
Lux is based on lumen, lumen and foot candle are both based on candela.
- Lux (lx) = the amount of, or the intensity of light that hits the surface below the light
- Lumen (lm) = the power of light (the light output) as perceived by the human eye (1 lumen on 1 m2 = 1 Lux)
- Candela (cd) = the power emitted by a light source in a particular direction
- Foot candle (fc) = the amount of illumination inside the surface of a 1-foot radius sphere were one candela in the exact center of the sphere.
When you read about the light requirements for orchids, you often see it listed in foot candles. Full, unobstructed sunlight has an intensity of approximately 10,000 fc, an overcast day will produce an intensity of around 1,000 fc. But since no light sources are ever referred to in those units some *fancy math is required in order for you to figure out what you need.
Supplemental lighting is most effective when the ambient light levels are low. For example: on cloudy days in the winter, and in the early morning and late afternoon. Furthermore, if you half the distance from the light source to the orchid you quadruple the light (yep – it’s physics people). By adding a reflector you can ‘roughly’ double the light simply by focusing it better. Not much growing happens by the light lost out the back of the fixture…
Practical application
Since the light recommendations listed for many orchids refer to peak sun hours at noon, it does not account for the change in light levels over the course of the day in nature. This means that when we grow under artificial lights we can make up for the lack in power by running our lights at peak output for longer durations instead. And by placing the light closer to the orchids and adding a reflector you maximize the effect.
*The fancy math bit: 1 fc is = 10.764 lux = 10 lumens per square meter (cool online converter)
Types of light sources – or the search for the holy grail
First, let’s get the typical old fashion light bulbs, or incandescent out of the way. Because if you are serious about growing orchids we do not have to spend a whole lot of time talking about these… The typical incandescent bulbs are about 2700 K, they have a short lifespan, burns hot and inefficiently. Halogens are basically just a newer type of incandescent bulb. They burn about 25-30% brighter than regular incandescent bulbs. This is of course better than having no supplemental lighting at all in the deep of winter, but they are still quite inefficient – you can do much better.
A lot has happened in the field of LED grow lights in recent years. Finally I would say it is good enough for orchid culture, both practically and aesthetically, and environmentally smart as an added bonus. I am very eager to dive into all of that, and trust me it is exciting technology, but a whole new science. So it may be a while before I get around to it.
HID (high-intensity discharge) lights
The science bit
There are three basic types of HIDs: mercury vapor, high pressure sodium, and metal halide. Many serious growers advocate the use of these. Although quite effective, I think that they are a bit impractical for many hobby growers. But the main strike against these lights in my book is that they do not focus on the spectrum of light that plants actually need (see PAR). Instead they work on the principle that since they put out so much power there is enough of the usable spectrum to make them effective grow lights. So, not only are they expensive to run, the bulbs can be expensive to replace. They also run very hot and distort color, sodium and mercury lights especially. Read more on HID technology.
Practical application
In short – HIDs mean a whole lot of wasted energy and too much heat from a rig in my opinion. Bulbs are expensive to replace and many of the fixtures are also rather bulky and hard to place unless you have a greenhouse.
Fluorescent and Compact Fluorescent (CFL) lights
The science bit
I prefer using Fluorescent and Compact Fluorescent (CFL) for a number of reasons. They are low energy which means they are cheaper to run than regular incandescent bulbs (and certainly cheaper than the HIDs). They are also much more efficient. Fluorescent lights emit about four times as much light per unit of electricity compared to incandescent lights. They also run much cooler, and the CFL’s run even cooler still. In a small growing space the amount of heat produced by the lights really matter, so that is one of the main reasons I prefer compacts over regular T5 fluorescents. Read more on fluorescent technology.
Until recently fluorescents have not been efficient enough to be comparable to HID’s, but with the developments of compact fluorescents and T5 technology this has changed. For example, each 55w CFL bulb in my Nebula produces 4500 lumens:
- 4 CFL fluorescent = 220 watts (18,000 lumens, 81.81 lm/w)
- 250 MH metal halide (23,000 lumens, 92 lm/w)
- 250 HPS high pressure sodium (28,500 lumens, 114 lm/w)
Practical application
For supplemental lighting, go for daylight fluorescent lights or CFL’s. These try to emulate natural daylight and you will get good grow results and at a pleasant light temperature – so you can enjoy looking at your orchids while they grow. There are some really good new PLL CFL’s on the market now. The three main manufacturers (in Europe) call these by different names but it is basically the same thing. Dulux L (Osram), Lynx L (Sylvania), or PL-L (Philips).
The triphosphor coating on these lamps gives a decent (but not great) CRI value (around 80+), long life and high lumen maintenance. They will only run you about 60 sek ($8-10) each, well worth every penny. These 860 and 865 daylight bulbs come in both 55 or 80W, and even though they are a bit on the cool side they will look pretty natural to us here in the northern hemisphere. I think it is just a matter of time before more people switch from HIDs to these.
Life expectancy vs. service life
The science bit
Incandescent bulbs last about 1000 hours, halogen may double that at best, but these CFLs are rated for 20 000 hours or more. Most lights will lose some performance over time due to cathode decay, and fluorescents are no different. This is an exponential decay, so most tubes should optimally be replaced once every- to every-other year or so. The ones I buy can go 2-3 years – but that means you cannot wait until the bulb fails to replace it. Look at the lifespan rating on the light source, it tells you when you should replace the bulbs for them to be effective at what you need them to do – grow orchids!
I actually called and talked to a Mr. Lombard (the guy in charge of fluorescent lights at Philips here in Sweden), he explained that the lifespan rating for fluorescent lights are not calculated the same… Low energy CFLs (according to EU standards) are rated in the average life expectancy of the bulb (basically until it dies), while regular fluorescent tubes are rated to service life – in other words how long the tube performs as expected, not until it dies! Service life is obviously more interesting to know.
When calculating service life a good fixture with soft start technology is used and the light is left on for at least 3 hours every time it is turned on. Since we keep our grow lights on much longer (typically 12-16 hours per day) it increases the service life quite dramatically since the degradation effect is more limited.
Practical application
Figure out what the requirements of the species you want to grow. Take into account your growing accommodation before choosing what kind of supplemental lights to buy. Then, get the best you can afford. The value of good lighting cannot be overestimated and the more the better – more or less. Modern light bulbs are so good now that it is a waste to throw them away after only one year (like some growers still do). Instead, find out what the service life of your bulbs are and replace them accordingly.
Example: My CFL’s are rated for 20 000 hours (lifespan), but they have a service life of 14 000 hours. If left on for 12 hours each time (instead of 3 like in the test) the service life extends to about 16 000 hours. This amounts to about 3.6 years at 12 hours/day (or about 3 years averaging at about 14 hrs/day).
Growing under lights
The science bit
My growing room gets very little direct sunlight, so my supplemental lights are on year round. Research has shown that a period of dark (minimum of 6 hours) is important to allow the plants to incorporate the food it has made during photosynthesis (when the lights are on). So I adjust my artificial lights according to the daily rhythm (night/day). Most of the orchids I grow come from Latin America where there is very little difference in light levels seasonally, so I just keep my lights on for about 12 hours a day year round.
In nature the sun is up for say 12 hours each day, but the light varies in intensity over the course of the day – compare dusk and dawn to mid day light levels with some cloud coverage or fog for example. Keeping the artificial lights on at a constant level for a longer period of time each day compensates for the lack of intensity by the lights compared to that of the sun. Keeping everything on timers is essential for your sanity. A cheap mechanical timer will do fine. I connect all my 7 fixtures to one timer using a power strip.
Ok, I am ready to figure it all out… how much power do I need? Simply put you could never have too much light. But for most windowsill gardeners a few CFL’s will do the job – we are talking about supplemental lighting after all – hopefully there is also daylight available to help pull the weight. But if you are planning something more involved these numbers could come in handy. The theory change all the time along with technology advances, but a rule of thumb is that in order to sustain a good rate of growth you will need:
- Minimum: 21 500 lm per square meter (2 000 lm per square foot)
- Mid range: 54 000 lm per square meter (5 000 lm per square foot)
- Optimal: 75 000–80 000 lm per square meter (7 000–7 500 lm per square foot)
Practical application
Now that you have finally installed some supplemental lighting over our windowsills or guestroom conversions, garages, closets… what have you. What does this actually mean? Well, it means that we now can compensate for the lack in power by running the lights longer at the same intensity. Naturally the estimates given below differ depending on what lights you have, but here are a few basic guidelines:
- Low (1000–2000 fc) = 2 hr filtered sunlight, or 14 hr under lights (20 cm distance)
- Medium (2000–3000 fc) = 4 hr sunlight, or 16 hr under lights (15 cm distance)
- High = (3000–4000 fc) = 6 hr sunlight, or 16 hours under lights (8 cm distance)
My growing areas
*A lot has happened in my life since I published this content. In a nutshell, I have moved to New Zealand, so my growing conditions have completely changed and I no longer have to grow indoors. As of 2016 I no longer update this website, but I have chosen to leave the content up as a legacy of information for anyone who might find it useful. Cheers!
Growing room and intermediate vivariums
Since I grow in a pretty dark north/east facing window, my supplemental lights are on year round, but are especially needed during the darker months out of the year. We only get about 6 hours of daylight in Gothenburg in January, so supplemental lights are a necessity.
I use two Nebula Hobby light fixtures in my tall window. One cover the top two shelves and a second one hangs about half way down and cover the lower two shelves and the nursery bench for the flask babies. I use the same fixture for my warm vivarium – what can I say, I like it. The reflector design creates a positive airflow, which helps to keep the heat away from both plants and gear. Complete with warmstart system for optimal lamp life as well as instant bright running. Unfortunately they do not come with a reflector, the fixture is painted white inside. But I just got some diamond mylar and glued them in place as reflectors for mine.
For the warm vivarium (75cm wide 80 cm tall 40 cm deep) I place synthetic wine corks between the light and the glass in the summer to help ventilate some of the excess heat generated by the light away from the viv. For really hot days I place an 80mm computer fan by the end of the light as well for the same purpose. In the winter the light help heat the small growing space.
Each Nebula fixture came with two 55W CFL tubes from Osram (Dulux L 55W/954) which amounts to about 6000 lumen at 5400K (slightly cooler than daylight) with a CRI value of 93% per fixture. They are rated for 10 000 hours, but has a service life of about 16 000 hours, in other words 3 years at 14 hr per day.
Photos


Cool vivarium
For the large cool vivarium (175 cm wide, 160 cm high and 65 cm deep) I use 4 Dulux 80W lights. Same technology as the 55W lights in the Nebulas, but they are quite new and I could not find any proper fixtures for them, so I made my own. I got electronic ballasts then bought reflectors for regular T5 tubes, but them in half and put them together to make a perfect reflector for the Dulux lights. The new 80W Dulux L 840 are very intense and especially suited for tall vivaria – up to 180 cm tall. Color rendering is 85% accurate. Each light put out 6000 lumen, so I get a total of 24000 lumen spread out over 175 cm width. At 4000 K the white light is close to the natural daylight range of the color spectrum. I would prefer a color temp closer to full spectrum, but with a tall vivarium like this I still feel this is my best option. They have a rated service life of 8000 hours, but with the kind of use I do, light replacement is recommended every 2,5 years.
Photos


To summarise
- 1 fc is = 10.764 lux = 10 lumens per square meter (cool online converter)
- Lux is the amount of light that hits the surface below the light, Lumen is the light output of the light source
- Candela is the power emitted by a light source in a particular direction, and Foot candle is the amount of illumination inside the surface of a 1-foot radius sphere
- Adding a reflector “roughly” doubles the light by aiming the light better
- The service life is what matters with modern fixtures and bulbs… find out what it is and replace the light sources accordingly – not yearly “just because”…
- Distance matter even more… if you half the distance you quadruple the light